This article describes how to integrate Smart ID Messaging with other Smart ID components (Identity Manager or Digital Access).
Each client (Identity Manager, Digital Access etc) that connects to the messaging service must be added to the configuration file and set up with an api key.
From Smart ID Messaging component Hermod version 3.5.0, swagger is enabled by default. See heading “If needed, edit Hermod configuration” in Install Hermod for an example.
-
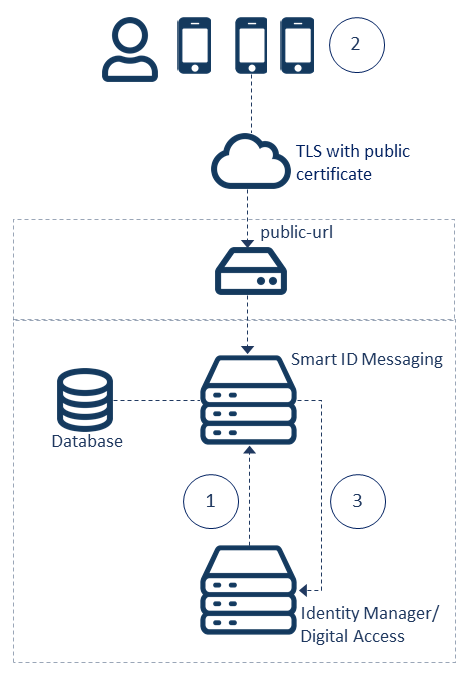
The Smart ID component (Identity Manager or Digital Access) connects to Smart ID Messaging with the API key for the specific client, and initiates a command.
-
The command is then processed by a device and a response is sent back to the
public-urlas configured in Smart ID Messaging. -
When the command has been processed by the device or when it has expired, the returned response is validated by Smart ID Messaging and a callback is sent to the configured
callback-urlfor the originatingclient-id.
Prerequisites
-
Smart ID is installed, see Deploy Smart ID.
Step-by-step instruction
Configure clients
Start the messaging service
-
Go to the application folder, for example <SMARTIDHOME>/docker/compose/messaging.
-
Run this command:
...
docker-compose start
Generate a template for a client section
Note: If Smart ID Messaging is going to be used both for Identity Manager and Digital Access, the group must be the same for Identity Manager and Digital Access.
Generate an Identity Manager (IDM) client
-
Open a browser and go to the following URL to generate an 'idm' client:
Example: Generate 'idm' client URL
http://<MESSAGING-HOST>:20400/util/generateclient/idm -
Copy the content from the resulting web page and paste it into the
allowed-clientssection of the messaging service configuration file. Then modify it according to your system setup. This enables, for example, that an issued Mobile ID or Smart Card issued in Identity Manager, can be used in Digital Access.Example of a configured 'idm' client
# X-Api-Key: aWRtOjQ0NjAyMDEzNGVlODQyMmRiNTc2OWZiZWY5MTA0YTQxNTc3Mjg2MTAyMzZkNGRkMWE0YjM3ZjkzNWRhYjQxMGE=
- client-id: idm
  key: 446020134ee8422db5769fbef9104a4157728610236d4dd1a4b37f935dab410a
  group: smartid
  # Callback Basic Auth is Required for Identity Manager callback.
  callback-basic-auth: username:password
  # The callback URL base for Identity Manager
  callback-url: https://<IDM-HOST>/ws/hermod
If you are deploying Identity Manager with war files, the callback url is
https://<IDM-HOST>/idm-operator/ws/hermod
Generate a Digital Access (DA) client
-
Open a browser and go to the following URL to generate a 'da' client:
Example: Generate 'da' client URL
http://<MESSAGING-HOST>:20400/util/generateclient/da -
Copy the content from the resulting web page and paste it into the
allowed-clientssection of the messaging service configuration file. Then modify it according to your system setup.Example of a configured 'da' client
# X-Api-Key: ZGE6YjIwZjBmZDkwYThiNDhjNWFhOWI2OTRiOGU3ZGQxMWUyMDA0MDI5NWFmYjY0NmVhYmRjODk4MDFiNjVkZGUzNg==
- client-id: da
  key: b20f0fd90a8b48c5aa9b694b8e7dd11e20040295afb646eabdc89801b65dde36
  group: smartid
  # The callback URL base for Digital Access.
  callback-url: https://<DA-HOST>/https/api/rest/v3.0/personalmessaging
Placement of certificates used for the callback connection
-
Place any certificates used for the callback connection in the cacerts/ folder, in base64 format (PEM) with the .cer file extension.
-
When the messaging service start, you will see logs like
INFO: Adding certificate xxx.cer using alias xxx
printed before the big "Hermod" ASCII art, see this example:... INFO: Adding certificate xxx.cer using alias xxx ... ██╗ ██╗███████╗██████╗ ███╗ ███╗ ██████╗ ██████╗ ██║ ██║██╔════╝██╔══██╗████╗ ████║██╔═══██╗██╔══██╗ ███████║█████╗ ██████╔╝██╔████╔██║██║ ██║██║ ██║ ██╔══██║██╔══╝ ██╔══██╗██║╚██╔╝██║██║ ██║██║ ██║ ██║ ██║███████╗██║ ██║██║ ╚═╝ ██║╚██████╔╝██████╔╝ ╚═╝ ╚═╝╚══════╝╚═╝ ╚═╝╚═╝ ╚═╝ ╚═════╝ ╚═════╝ ... ... -
If you do not see any logs, there is something wrong with either the mapped directory or the certificate files themselves.
-
Make sure that the cacerts folder has right permissions (e.g. 755)
-
Make sure that you have used the correct syntax for mounting directories to the docker container in docker-compose.yml.
-
Configure the public base url for the messaging service
The public-url setting in hermod-conf.yml is the URL that external apps, such as Smart ID Mobile App and Smart ID Desktop App will connect to. You must be able to reach it from internet and TLS must be used to make sure that the external apps work.
-
Set the public-url, see this example:
Example: Set public-url
...
    # Message server library settings
    message-server-library:

      public-url: https://<MESSAGING-SERVER>/ms
Clients such as Digital Access and Identity Manager do not use the public-url. They should be configured to use "http(s)://<MESSAGING-SERVER>/command" which is the base url for endpoints that trigger various commands, such as provisioning, authenticate etc.
Configure TLS
When you use TLS for the public-url, you need to either:
-
terminate SSL in ingress/proxy traefik
OR
-
configure the server.ssl section in config/hermod-conf.yml. This is described below.
-
Place your certificates (p12 format) in the SmartID certs folder which is mapped to a certificates folder inside the running docker container. In the example below, the file smartidtls.p12 is used.
-
Enable the setting as seen below and make sure to set the correct password.
Configure SSL in hermod-conf.yml
server:
  ssl:
    enabled: true
    key-store: /home/docker/certificates/smartidtls.p12
    key-store-password: "<somepass>"
    keyStoreType: PKCS12
Initialize the database
The database for Smart ID Messaging must be initialized using files for the specific database engine and version of Smart ID Messaging.
For a new installation, do the following:
-
Use the files called Vx.y.z__base_version.sql matching the specific version (for example, V3.2.0__base_version.sql).
For an upgrade, do the following:
-
Use all files between the previous version and the new version which are not named Vx.y.z__base_version.sql (for example, V2.5.1__new_indexes.sql, V3.1.1__lifesign_table.sql etc)
-
You might have to edit the files to match the correct database user.