This article includes updates for Nexus Timestamp Server 2.3.0.
This article shows an overview of the Nexus Timestamp Server. Below is an illustration of a Nexus Timestamp Server system. It consists of two major components: one or more HTTP frontends and one backend.
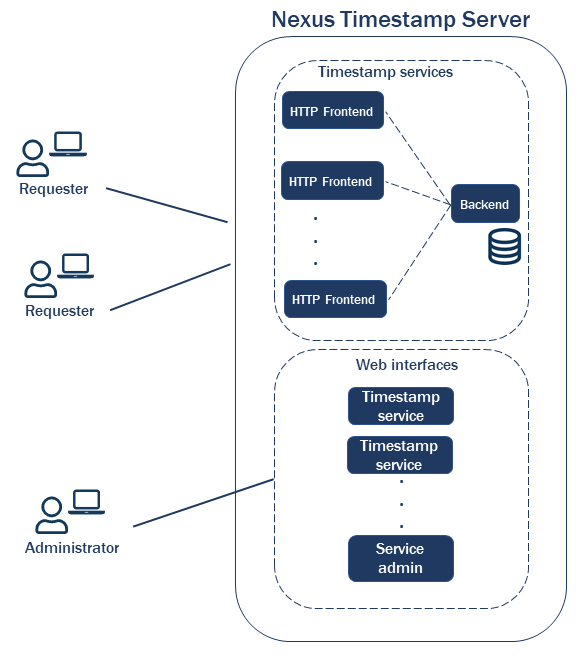
Timestamp services
Nexus Timestamp Server can contain multiple timestamp services. Such a timestamp service consists of one HTTP frontend, together with its configuration in the backend. A timestamp service has a policy which dispatches to filter chains composed by filters. Read more about this here Description of filters in Nexus Timestamp Server and Filter chains used in Nexus Timestamp Server.
HTTP frontend
The HTTP frontend is accessed by the end-users (requesters). There may be any number of HTTP frontends in a Nexus Timestamp Server system. One frontend, together with its configuration in the backend, represents one timestamp service.
Backend
The backend is the main component of Nexus Timestamp Server. The backend is where all timestamp requests are processed and timestamp responses are generated, according to the configuration per timestamp service. The requests and responses can be stored in a database for audit reasons.
Web interface
Nexus Timestamp Server includes a web interface with access to:
-
timestamp service administration
-
timestamp services
The web interfaces are addressed using URLs. Each functionality resides in a web application archive (“war”) file, located in the <install>/webapps directory.
Hardware Security Module
See Initialize Hardware Security Module in Timestamp Server.
Example scenario
Example A: A timestamp request
This scenario is simplified in that it does not describe any configuration, server setup or advanced features etc.
-
The user or system, called requester, sends a timestamp request in accordance with RFC3161.
-
The timestamp service detects if it is a timestamp request and if so redirects the request to the proper policy within the backend.
-
The backend handles the policy and all the included filters according to the order in the configuration.
-
The backend stores the information in the logs and database according to the configuration.
-
After successful timestamp request a timestamp response is generated and sent back to the HTTP frontend.
-
The HTTP frontend sends the timestamp response back to the requester.
Example B: An Authenticode timestamp request
This scenario is simplified Microsoft Authenticode Timestamp.
-
The user or system, called requester, submits an authenticode timestamp request following Microsoft’s guidelines for Authenticode Signature, utilizing Windows PowerShell.
-
The timestamp service detects if it is an authenticode timestamp request and if so redirects the request to the proper policy within the backend.
-
The backend stores the information in the logs and database according to the configuration.
-
Upon successfully receiving an authenticode timestamp request, the timestamp service generates an authenticode timestamp response and sends it back to PowerShell. Subsequently, PowerShell writes the signature to the specified file.
Configuration details can be found in: Configure Authenticode Timestamp
Additional information