The plug-in modular nature of PAM is used to get a Linux server to use RADIUS to authenticate users connecting via SSH.
This article describes how to setup a CentOS server as RADIUS client and Digital Access as RADIUS server. The pam_radius_module is used to provide the mechanism of authenticating ssh logins.
This article also describes how to enable Nexus OTP in Smart ID Digital Access component as two-factor authentication method for SSH login on Linux, to replace static passwords.
Nexus OTP can be either Nexus TruID Synchronized or Smart ID Mobile App OTP, or any other OATH-based mobile OTP application, such as Google Authenticator or Microsoft Authenticator.
Nexus TruID is used as an example below and is available for iOS, Android, and Windows.
Network schematic for Nexus OTP authentication
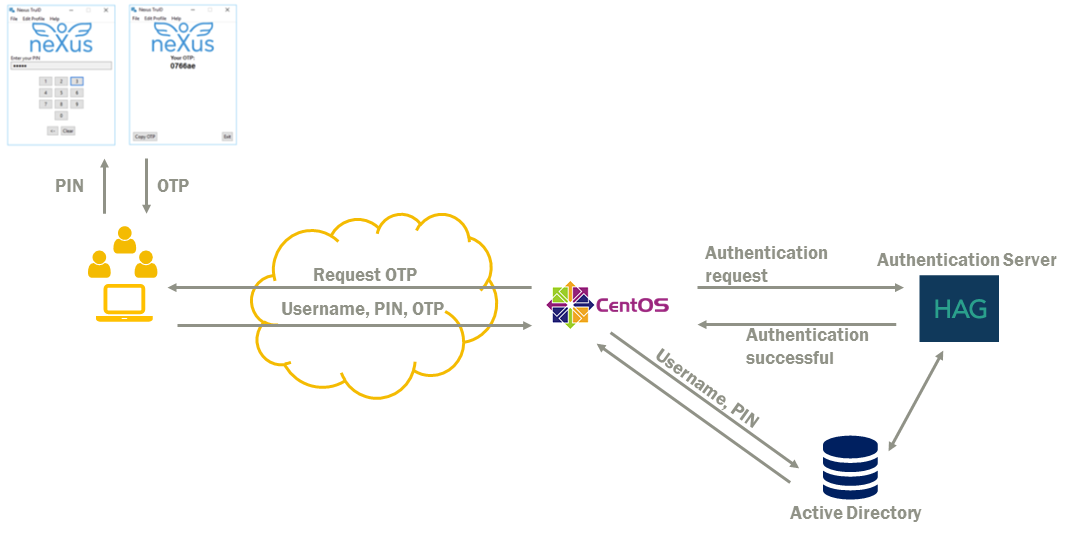
Network schematic with Nexus TruID Synchronized as an example.
-
The administrator configures CentOS Server to use RADIUS authentication.
-
The incoming authentication request is relayed over to Digital Access Authentication Server via RADIUS.
-
If the user exists, it then checks the token associated with the user for the expected PIN + One-time password
-
Once the PIN + One-time password is verified against the user’s token and it is valid, it will then send an access accepted
Configure Linux server
To build a radius client module for the CentOS Linux server, follow these instructions.
Configure CentOS server to use RADIUS authentication
-
Create a user you wish to login as on the CentOS system, in this example the user is called testuser:
useradd -d /home/testuser/ testuserYou do not need to set a password for this Unix user since your radius account is used to provide the password.
-
Create a directory under the /etc folder called raddb:
mkdir /etc/raddb -
Copy the sample client configuration file pam_radius_auth.conf to /etc/raddb/server:
cp /root/pam/pam_radius-1.3.17/pam_radius_auth.conf /etc/raddb/server -
Open the /etc/raddb/server in an editor, for example, vi.
-
In this section, add a line that represents your RADIUS server (HAG):

-
Enter your server’s hostname or IP address and a shared secret used to assign in this file and on your RADIUS server. Make a note of this password.
-
In this example the RADIUS server "nexus Auth IP" is added with a shared secret of "123456". So after editing the file looks like this:

-
-
Edit the /etc/pam.d/sshd file. This file controls the authentication method for sshd service which facilitates SSH logins. We need to tell it to use the /lib/security/pam_radius_auth.so file we created and compiled earlier.
Before the top line:
add this line:
So the first two lines will look like this:
sufficientshould be substituted byrequiredafter the SSH login has been successfully tested.
This will tell the SSH service/daemon to use the RADIUS protocol and server for authentication. With this configuration the SSHD will also check local system account passwords as a fall back. This means you can log in as root or other Unix local accounts should your RADIUS server be offline.
You are changing the authentication method for logging in to your CentOS box via SSH. Make sure you can get into it via console (monitor mouse and keyboard) in case this goes wrong and you get locked out of SSH.
Make settings in Digital Access
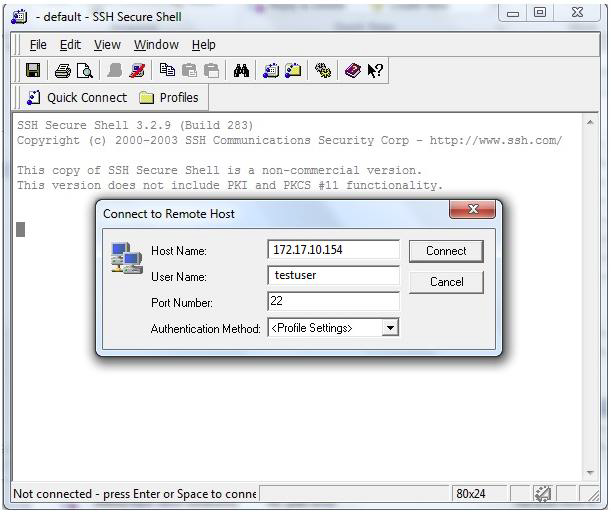
Example: SSH Login to the CentOS System
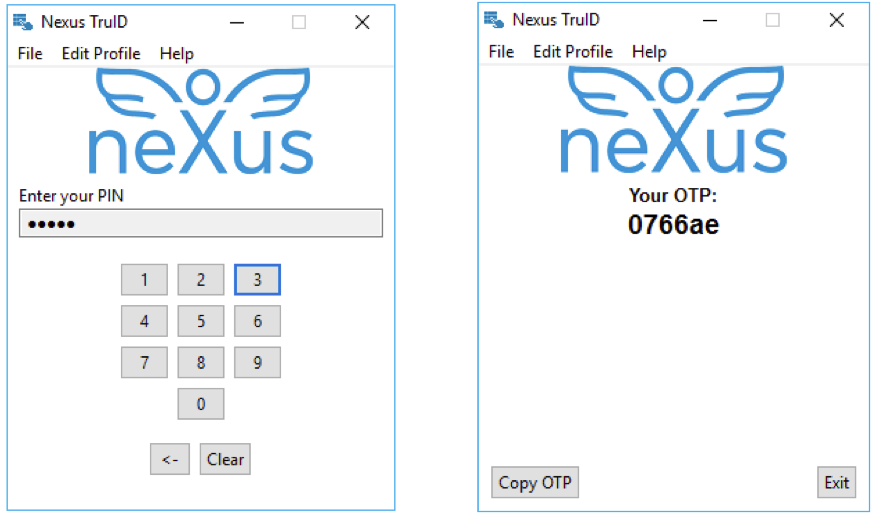
Example: Use Nexus TruID as 2FA for SSH Login to the CentOS System
-
Start an SSH (Secure Shell) client and supply IP address, username and port of the CentOS system, for example:
-
When you are prompted to enter the password, start Nexus TruID that is installed on your laptop or smartphone - Enter your PIN to generate an OTP.
-
Use the OTP as the password for the SSH prompt.
Related information
-
CentOS