Process request for cross certificate in Certificate Manager
This article includes updates for CM 8.10.
This article describes how to import a cross certificate request from an external Certificate Authority (CA), outside Smart ID Certificate Manager (CM), create the signing CA certificate and export that CA certificate to be returned to the originating CA. This task is done in the Administrator's workbench (AWB) in Certificate Manager (AWB).
Prerequisites
The following prerequisites apply:
Two administration officers must sign the request.
Both officers must have the following roles:
Use AWB
CA and Key tasks
A connection to the CM host must have been established (see Connect to a Certificate Manager host).
The required parameters for the cross certification must be known and have been agreed upon.
Import a cross certificate request from an external CA
Clicking Save at any time during the creation of the CA, before clicking OK, will save the data and place the incomplete CA in the Authority Hierarchy.
To complete the CA creation at a later stage:
Highlight the CA in the explorer bar.
Select Modify from the Edit menu, the toolbar, or the right-click shortcut menu.
To customize the certificate attributes in the Modify dialog, see the "Set certificate attributes" section in Create CA in Certificate Manager.
When customizing the certificate attributes display, selecting Auto add data fields in the Fields Chooser will override any settings and present all available certificate fields that contain data.
In AWB, select Cross > Import Request.
In the Select File Containing Request dialog, select the relevant request file and click Open.
In the Modify Cross Request dialog, enter the CA name (in Authority name) that should appear in the Authority Hierarchy in the explorer bar. This field is mandatory.
If required, modify State, Domain and Visibility in subdomain.
Set Authority type to CA
To modify the CA Valid from and Expiration date fields, highlight in turn the days, hours, and minutes and adjust using the up and down arrows. The individual units of date and time may also be entered manually.
Click the Issuing CA browse button to open the Select Authority window.
Click on the required CA to highlight it and click OK. The selected CA appears in the Issuing CA field. This field is mandatory.
To select the CA usage, check Certificate signing and/or CRL signing. Selection of at least one option is mandatory.
Select the required Signature algorithm from the drop-down list.
Click the Format browse button to open the Select Certificate Format window.
Click on the required format to highlight it and click OK. The selected certificate format appears in the Format field. This field is mandatory.
The format must accept the authorityKeyId from the request. This is done by the subordinate-ca-cert format. If any other format is chosen, ensure that the format is suitable. This field is mandatory.
Once a format has been selected, you can customize the set of format definition fields and modules.
At Format, click Advanced.
A pop-up window will appear containing all fields and modules from the selected format file.
The modules are shown in the top section with their indexes in the right column (the indexes determine the execution order of the modules).
The format definition fields are shown in the bottom section with the values of the parameters in the right column. You can edit the values for the definition fields parameters and store them for this particular procedure.
Here is an example with the certificate format rfc5280.
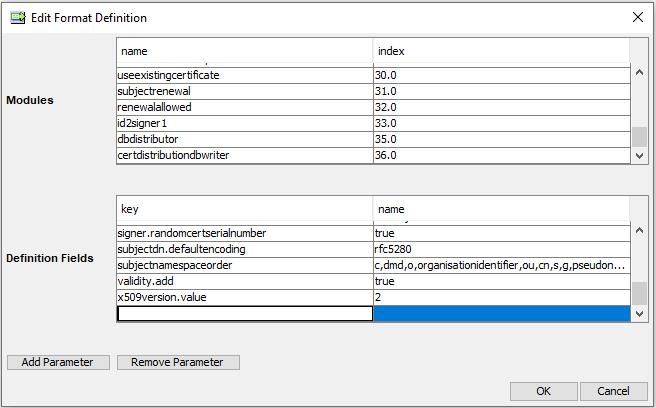
To add new format definition fields or modules click Add Parameter or Add Module. For added fields and modules (that are not present in the format file) you can edit values in the left column and also remove the row with Remove Parameter or Remove Module.
The new values will take precedence over the values in the format file, but the format file will not be affected by these changes.
Click OK. The Signature dialog box appears. See Sign tasks in Certificate Manager for more information.
Export the CA certificate to be returned to the originating CA
Highlight the CA created above and select Cross > Export Certificate.
Select the required file format, Binary or Base64, from the sub menu. Use Base64 if the certificate is to be sent to the external CA by email. The Select File for writing Certificate browser window is displayed.
Enter the name of the file to be used for the certificate and select its required location.
Click Save.
The file containing the certificate should now be forwarded to the external CA.