Skip table of contents

Set up access to Confluence with Digital Access as identity provider

This article describes how to configure Confluence with SAML connection to Smart ID Digital Access component (as Identity Provider).

Prerequisites

A server certificate that will be used for the SAML configuration must be uploaded. An already existing certificate can be used.

Step-by-step instruction

Log in to Digital Access Admin
  1. Log in to Digital Access Admin with an administrator account.

Settings in Digital Access
  1. In Digital Access Admin, go to Manage Resource Access.

  2. Click SAML Federation > Add SAML Federation.

  3. In the General Settings tab enter a Display Name. Example: ConfluenceFederation

  4. Check Acting as Identity Provider.

  5. Uncheck Import metadata automatically.

  6. Go to the Export tab.

  7. Enter Entity ID. It must be unique among other SAML federations. Example: https://confluencefederation/ipd

  8. Leave the API Path as it is.

  9. Select a Signing Certificate.

  10. Select an Access Point DNS Name.

  11. Click Add to save the new federation. We will add an Identity Provider shortly.

  12. Go to Confluence to continue the setup.

Settings in Confluence
  1. Open the administration interface in Confluence (or JIRA).

  2. Select Manage Add-ons and select to install the SAML 2.0 Single Sign-on for Confluence plugin from Bitium.

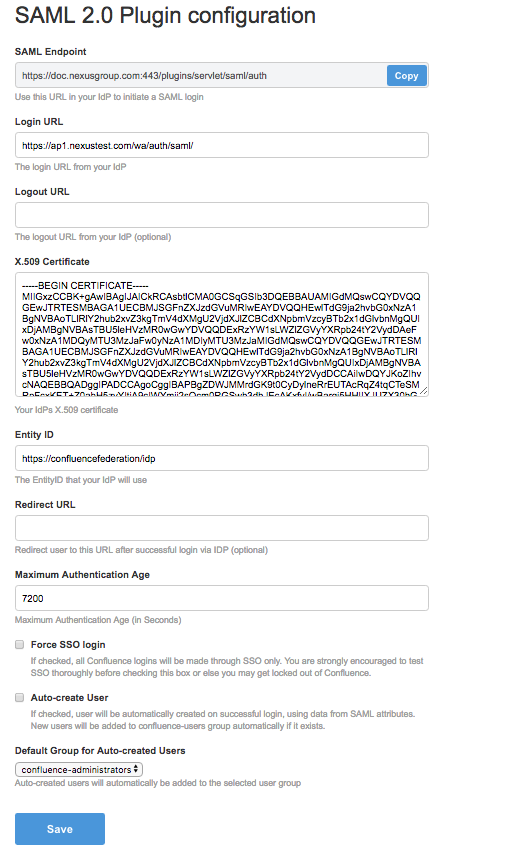
  3. Configure and enter settings like this. The certificate is the certificate used in Digital Access as signing certificate.

  4. Go back to Digital Access Admin and continue the setup.

Continued settings in Digital Access
  1. In Digital Access Admin, go to Manage Resource Access.

  2. Click SAML Federation and select the newly added SAML federation to edit it.

  3. Go to the Role Identity Provider tab and click Add Service Provider.

  4. Under Add manually, select SAML 2.0 specification and click Next.

  5. Enter a Display Name, a unique name used in the system to identify the service provider (that is, Confluence). Example: MyConfluenceServer

  6. Enter Entity ID. This is a unique identifier of the service provider (that is, Confluence). Example: <Url as Confluence knows itself>/confluenceSAML (or jiraSAML)

  7. Enter Service Provider URL. This is the value of the topmost field in the Confluence configuration. Example: https://doc-editor.nexusgrcom/plugins/servlet/saml/auth). If the Confluence server is protected by Hybrid Access Gateway (that is, configured as a resource), the values should be as the Confluence server knows itself. It could be an IP address.

  8. With these settings, a basic functionality is set up. To do more settings, edit the service provider and go to the Assertion Settings tab.

  9. The end user in Confluence can now click Corporate Login on the user login page.

Troubleshooting
  • If a 403 page is shown, investigate the audit log for the Policy Server in Hybrid Access Gateway trying to find out what is wrong.

  • If the page comes back with a red plugin error, look in the system log of the Confluence server.

Related information

JavaScript errors detected

Please note, these errors can depend on your browser setup.

If this problem persists, please contact our support.