Use case in Certificate Manager: Cross-certify Certificate Authorities
This article includes updates for CM 8.10.
Cross-certification in Smart ID Certificate Manager (CM) is a process performed by Certificate Authorities (CAs) to establish a trust relationship to each other. By cross-certifying a CA with another, they can trust each other's certificates and keys as if they were issued by themselves. This is useful when, for example, a root CA in an external system wants to delegate the responsibility of issuing certificates to other CAs.
In order to give authority to these CAs, they need to be cross-certified by the root CA. Thus there can exist hierarchies of CAs in various systems.
The following example shows how such an hierarchy can be created in CM systems. The technique is the same for both X.509 certificates and CVC (Card Verifiable Certificates, CV certificates), even if details may vary in the case of CVC. All steps described are performed in the Administrator's workbench (AWB).
Prerequisites
This example describes a cross-certifying process using CVC CAs, but the process is the same for non-CVC CAs, such as CAs based on X.509 certificates.
In this example:
The CVC issuer is "CVA" on system A
The external root is "CVB" on system B
If a CVC CA resides on some other CA system (non-CM), importing and exporting of certificates and keys are handled differently. For details on this, see section “Import and Export of CV CA”.
As prerequisite on system B, a self-signed CVC CA CVB must be created by authorized personnel. The certificate format cvc-ca is used. SECVB is used as CA name (Certificate Holder Reference) in the CV Certificate Data Elements fields.
Step-by-step instruction
The cross-certifying process
The instructions in this section is built on the example according to the prerequisites.
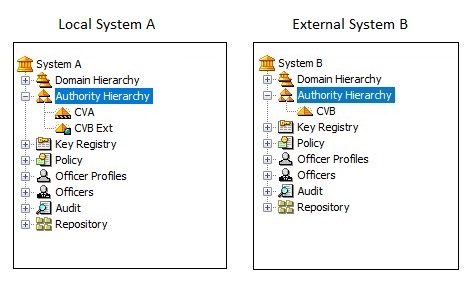
These are the initial CA hierarchies:

In system B:
Select CA CVB and export the certificate by selecting Export Certificate from the Cross menu.
In system A:
Import the certificate for CVB by selecting Import Certificate from the Cross menu.
Give the new external CA the name CVB Ext and sign. See Sign tasks in Certificate Manager for more information.
Create a CA with the name CVA. See Create CA in Certificate Manager and Use case in Certificate Manager: Prepare for Card Verifiable Certificate.
In Issuing CA, select CVB Ext.
Use SECVA as CA name (Certificate Holder Reference) in the CV Certificate Data Elements fields.
Save the request.
The created CA (and yet unsigned) will appear alongside CVB Ext.
Select CA CVA and export the request using Export Request from the Cross menu.
In system B:
Select Cross > Import Request to import the request from the previous step.
Name the CA CVA Ext. Choose issuer CVB and sign. See Sign tasks in Certificate Manager for more information.
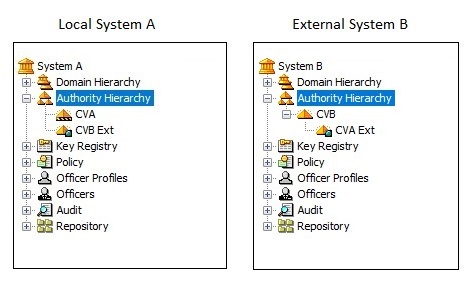
Select CA CVA Ext and export the certificate using Export certificate from the Cross menu.
In system A:
Select Cross > Import Certificate and select the exported certificate from previous step.
In the popup dialog, choose Go ahead with an existing Authority and select the request CVA.
Click OK and sign. See Sign tasks in Certificate Manager for more information.
These are the resulting CA hierarchies:
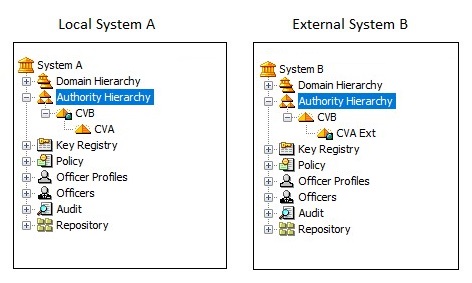
Result
The unsigned request for the CVA is replaced by the imported certificate. CVA can now be used to issue user certificates.
Import and export of CV CA
This section describes how CV CA certificates are imported and exported if the system from/to which the certificate is to be imported/exported, is not a CM system.
Import
In AWB, select Cross > Import Certificate. Select the certificate file in the displayed dialog.
If the selected file is a correct CV certificate, and the CV certificate is of generation G0 (CPI 0x3) or G1 (CPI 0x21), another dialog requesting the issuer's public key is displayed. (The issuer is the CA who has signed the certificate.) Select the file containing the public key.
The CV certificate will now be verified. If it succeeds, the attributes and the public key of the CV certificate are retrieved and the Importing Certificate for External key dialog is displayed.
Give the certificate a name to be shown in the Authority Hierarchy.
Click OK.
Sign the request in the dialog box that follows. See Sign tasks in Certificate Manager for more information.
Export
In AWB, double-click the icon for a CV CA. The certificate is displayed in a dialog box.
To save the certificate to a file, click Save certificate…
To save the public key of the certificate, click Save public key…