
This article is intended for the Smart ID Digital Access (DA) administrator. It explains how Transaction Signatures works and how to set it up from a fresh Digital Access, end to end. Once these steps are done, application developers follow the Integration Guide. See Transaction Signatures Integration Guide for details.
How Transaction Signatures work
Transaction Signatures lets a relying party (an application) obtain cryptographic proof that a specific user reviewed and approved a piece of data, such as a payment order, a contract clause, or a consent statement. The data is shown to the user during a SAML signing procedure (for example via Swedish BankID), and the signed result is stored immutably in a dedicated SQL Server LEDGER database.
The SAML loop is internal to DA. DA does not federate out to a third‑party SAML IdP. When you set this up, DA creates (or you select) a SAML federation in which:
-
DA itself is the Acting IDP (the federation has the Acting IDP role).
-
The Transaction Signatures REST API is the Service Provider (SP). Its Assertion Consumer Service (ACS) URL points back at DA's own endpoint
/https/api/rest/v3.0/sign/saml-response. -
The signing SP posts a signed SAML
AuthnRequestthat carries the to-be-signed text in the Swedish eID SignMessage extension to DA's own Access Point SSO endpoint (/wa/auth/saml/). DA's acting-IdP then runs the user through a signing-capable eID (BankID, Freja eID+) using DA's normal authentication/rules engine, and posts the result back to the SP's ACS.
So "the identity provider" in the flow is DA acting as its own IdP, fronting the eID. There is no external SAML party to exchange metadata with. DA generates the signing certificate, signs the request, and validates the response automatically.
The end‑to‑end flow
-
The relying party calls
POST /v3.0/sign/preparewith the data to sign and the expected signer's identity. DA returns a unique sign URL. -
The relying party redirects the user's browser to that sign URL.
-
DA presents the transaction text to the user via the configured eID (for example BankID). The user reviews and approves it in their eID app.
-
The eID confirms the signing back to DA. DA validates the SAML response, verifies the signer's identity, and stores the completed signature in the
LEDGER database. -
DA redirects the browser back to the relying party's return URL. The relying party retrieves the signature record (timestamp, eID provider, algorithm, signature value) via the REST API.
All REST endpoints require an OAuth2 Bearer token with the transaction_sign scope. Rate limits: 20 req/min per OAuth2 client on the API endpoints, 10 req/min per IP on the browser‑facing sign URL.
Prerequisites
-
License: a valid
Feature/Transaction Signaturessection must be present innexus.license. Without it, the admin page is read-only and the API returns HTTP 503. -
SQL Server 2022+ with LEDGER support: a dedicated database instance, separate from the main DA database.
The login needsCREATE TABLE,INSERT/SELECTon both tables, andUPDATE/DELETEonpresignatures(thesignaturesLEDGER table allows neither UPDATE nor DELETE by design). DA creates the schema automatically on first connection, but the database itself must already exist. LEDGER is a hard requirement: DA verifies at startup that thesignaturestable is anAPPEND_ONLY_LEDGERtable; if not, the feature refuses to operate. -
A signing-capable eID reachable through DA, for example Swedish BankID or Freja eID+. DA can auto-create a dedicated "Transaction Signing" SAML federation for this from the page (recommended), or you can point it at an existing one.
Freja eID+ note: configure the mechanism to return only SSN or BASIC_USER_INFO. The signing flow uses the personal number as the NameID for signer-identity binding.
-
OAuth2 client: the relying party must be registered under Manage System → OAuth2 with the
transaction_signscope, and its registered redirect URIs must include thereturnUrlused in prepare requests.
The configuration page: Manage System → Transaction Signatures
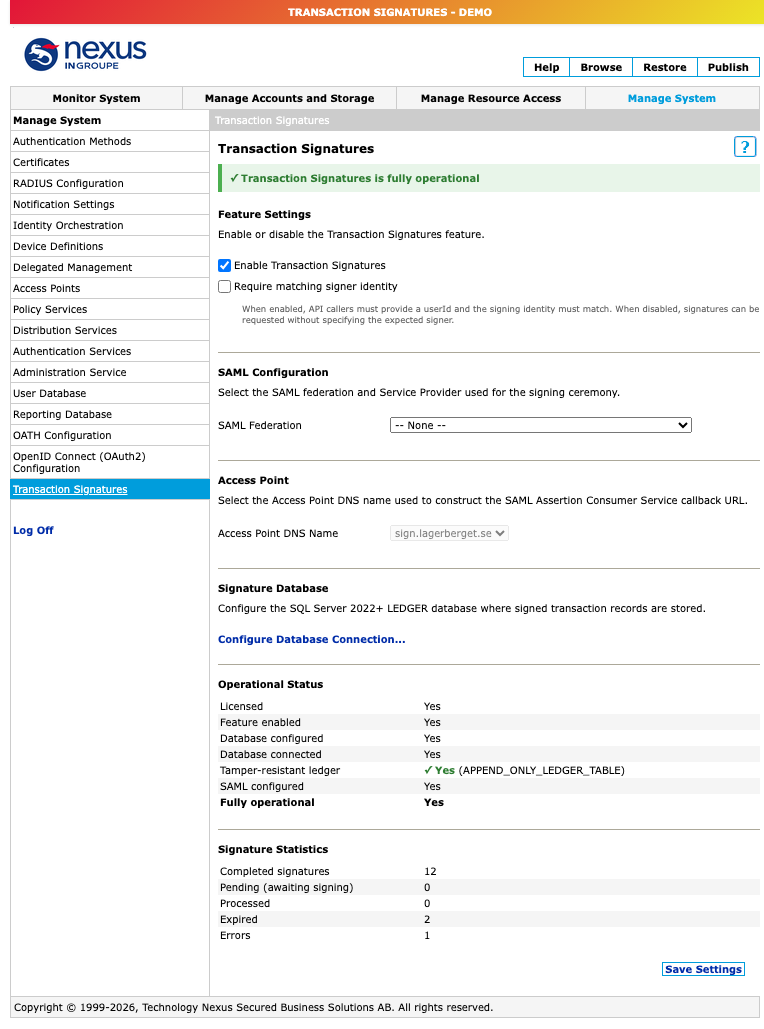
Feature settings
-
Enable Transaction Signatures: the master on/off toggle. When unchecked, all
/v3.0/sign/*endpoints return HTTP 503 immediately. Enable this only after the database and SAML settings below are configured and tested. Disabling does not delete stored signatures. -
Require Matching Signer (user identity binding mode, server-wide):
-
Checked (strict, default): the request is rejected if the person who authenticates with the eID is not the
userIdfrom the prepare request. No signature is stored. -
Unchecked (relaxed): a mismatch is logged but the signature is accepted; both expected and actual user IDs are stored for audit. Use relaxed only when someone may legitimately sign on another's behalf (e.g. power of attorney).
-
-
Platform Signing Key: on first enable, DA auto-generates an RSA-4096 key pair for platform-level non-repudiation. Each completed signature gets an RSA-SHA256 platform signature over its integrity hash;
GET /verify/{id}checks it. The key is stored encrypted and cannot be exported. No manual configuration needed.
SAML configuration
DA handles all SAML protocol details (signing-certificate generation, request signing, response validation) automatically.
SAML Federation: the drop-down menu has three options:
-
None: nothing configured; the feature cannot operate.
-
Create new "Transaction Signing" federation: DA automatically creates a new SAML federation with the Acting IDP role, a dedicated signing SP (ACS = the
/sign/saml-responseendpoint), and a self-signed signing certificate. You can create several; each gets a unique identity. Recommended. -
Select an existing federation: only federations that have the Acting IDP role and an SP whose ACS URL points at
/https/api/rest/v3.0/sign/saml-responseare listed. (SPs pointing anywhere else can't receive the signing response and won't appear.) You may also pick "Create new signing SP in <existing federation>" to add a correctly configured signing SP to a federation you already have.
Access Point DNS Name: the AP hostname used for the signing callback URL. This drop-down is only enabled when creating a new federation; otherwise the DNS name is derived automatically from the federation and the dropdown is grayed out. The Access Point must be reachable by the eID during signing. If DA is behind a reverse proxy/load balancer, use the external-facing hostname.
Signature database
Stored in a dedicated SQL Server 2022+ database, separate from the main DA database.
The signatures table is created with LEDGER = ON (APPEND_ONLY = ON), which means rows can never be modified or deleted, even by a DBA.
The schema is created automatically on first connect; no manual DDL is needed. Click Configure Database Connection… to open the dialog.
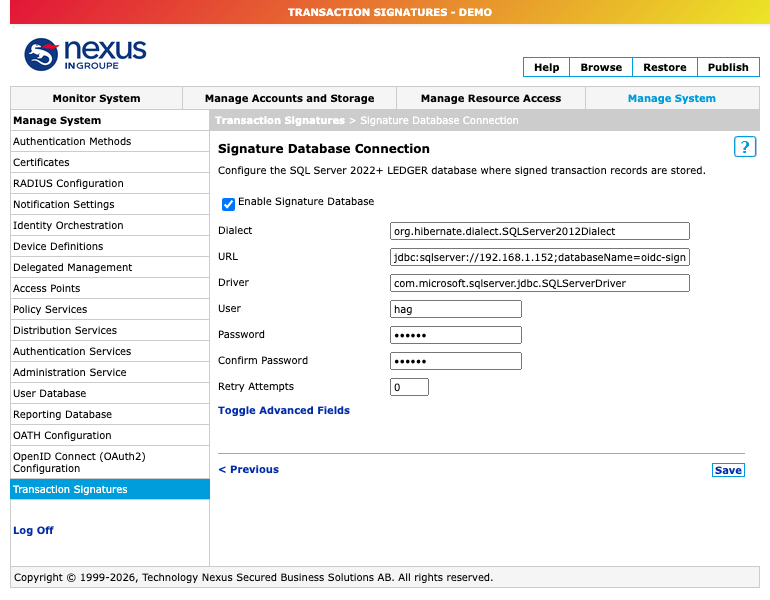
-
Enable Signature Database: activates the connection.
-
Host: SQL Server hostname/IP, optional
:port. Examples:sqlserver.corp.local,dbserver.corp.local:1434,dbserver\\INSTANCE. -
Name: the database name (must already exist), e.g.
signaturedb. -
User: the SQL login (permissions as in Prerequisites).
-
Password / Confirm Password: stored encrypted; enter the same value in both.
-
Retry Attempts: connection retries on failure (0–10; 0 = none).
-
Advanced fields (Toggle Advanced Fields): auto-populated JDBC settings, rarely changed:
-
Dialect:
org.hibernate.dialect.SQLServer2012Dialect -
URL:
jdbc:sqlserver://{host};databaseName={name} -
Driver:
com.microsoft.sqlserver.jdbc.SQLServerDriver -
Override only for non-standard parameters, e.g. append
;encrypt=true;trustServerCertificate=truefor TLS.
-
Operational status panel
The status table at the bottom of the page must show Yes on every row for the feature to be operational:
|
Indicator |
Meaning |
|---|---|
|
Licensed |
A valid |
|
Feature enabled |
The "Enable Transaction Signatures" checkbox is checked. |
|
Database configured |
Connection settings saved and "Enable Signature Database" checked. |
|
Database connected |
DA connected to SQL Server and the Hibernate SessionFactory initialized. |
|
Tamper‑resistant ledger |
DA verified via |
|
SAML configured |
A federation with a valid signing SP is selected; the callback URL is derived from its Access Point DNS. |
|
Fully operational |
All of the above are satisfied; the signing endpoints accept requests. |
Step‑by‑step: enable it the first time
-
Create the database. On SQL Server 2022+, create an empty database (e.g.
signaturedb) and a login with the permissions above. LEDGER is available in all 2022 editions, including Express. -
Configure the database connection. On this page, open "Configure Database Connection…", check "Enable Signature Database", enter host, name, user, password, and Save. DA tests the connection and creates the tables. "Database connected" and "Tamper‑resistant ledger" should turn green.
-
Configure the SAML federation. In the SAML Federation dropdown, either choose "Create new Transaction Signing federation" (DA builds everything automatically) or select an existing Acting‑IDP federation with a signing‑capable eID. If creating new, pick the Access Point DNS Name.
-
Register an OAuth2 client. Under Manage System → OAuth2, register the relying party with the
transaction_signscope and its redirect URIs (see next section). -
Enable the feature. Check "Enable Transaction Signatures" and Save Settings. "Fully operational" should turn green.
-
Test. Obtain a Bearer token with
transaction_sign, callPOST /v3.0/sign/preparewith test data, redirect a browser to the returned sign URL, and complete the flow. Confirm the signature record has the expected timestamp, eID provider, algorithm, and signature value.
Register the OAuth2 client
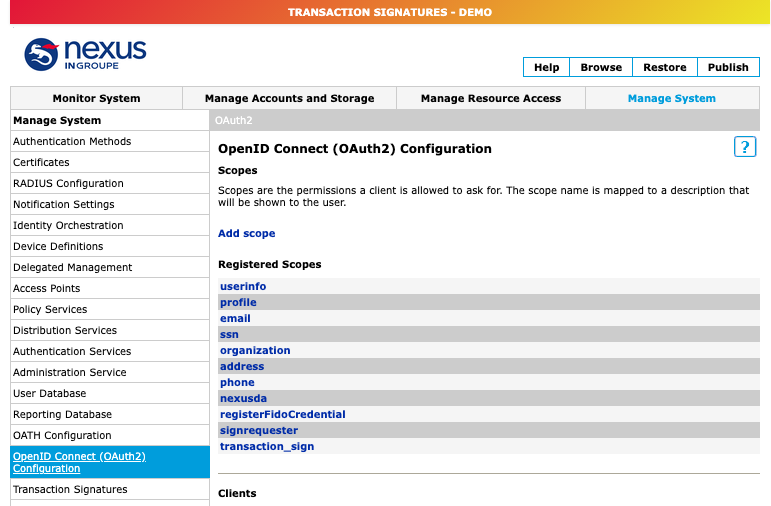
Under Manage System → OpenID Connect (OAuth2) Configuration, confirm the transaction_sign scope exists under Registered Scopes (add it if missing), then click Add client.
On the General Settings tab, set a Display Name, Generate (or enter) a Client ID and Client Secret (secret allowed chars: a-Z 0-9 - . _), and add every returnUrl under Redirect URIs. /sign/prepare validates returnUrl against this list and rejects unregistered URLs with HTTP 400.
Publish after any OAuth2 client change, and use HTTPS.
-
Changes are staged until you click Publish in the top admin menu. New OAuth2 clients and redirect URI edits do not take effect until then. Until you publish,
/oauth/tokenreturns HTTP 401 for the new client and/sign/preparerejects the newreturnUrl. This single step explains most "why doesn't my client work?" issues. -
returnUrlmust use HTTPS. Plainhttp://returns400 returnUrl must use HTTPS. -
returnUrlcannot belocalhost, but a real hostname or IP works, for examplehttps://192.168.1.168/sign-donewas accepted. Register everyreturnUrlunder Redirect URIs, then Publish.
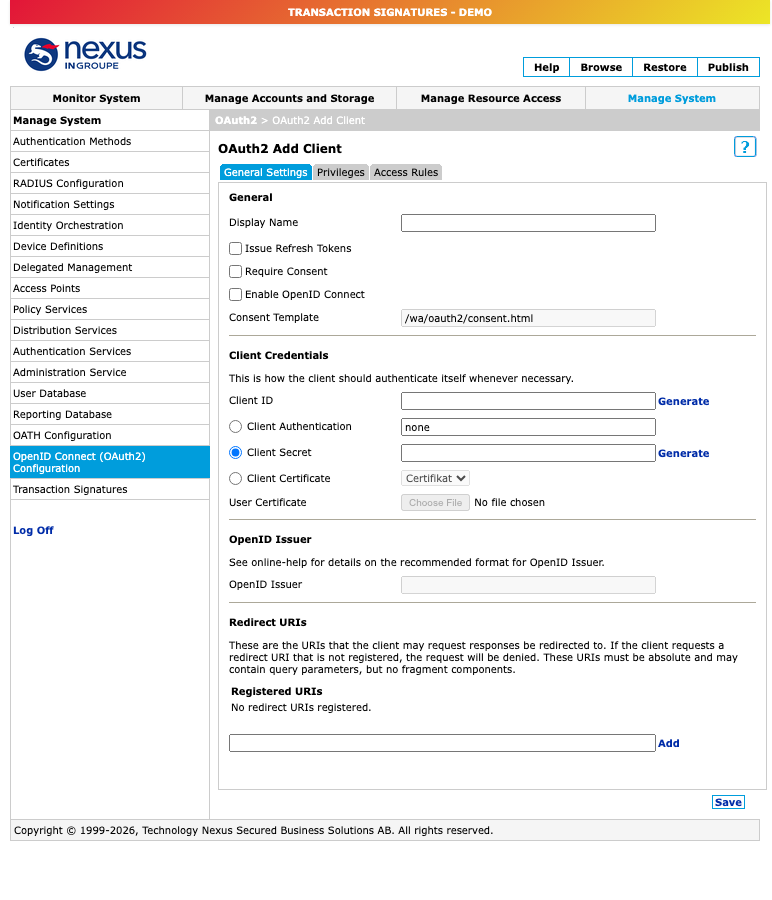
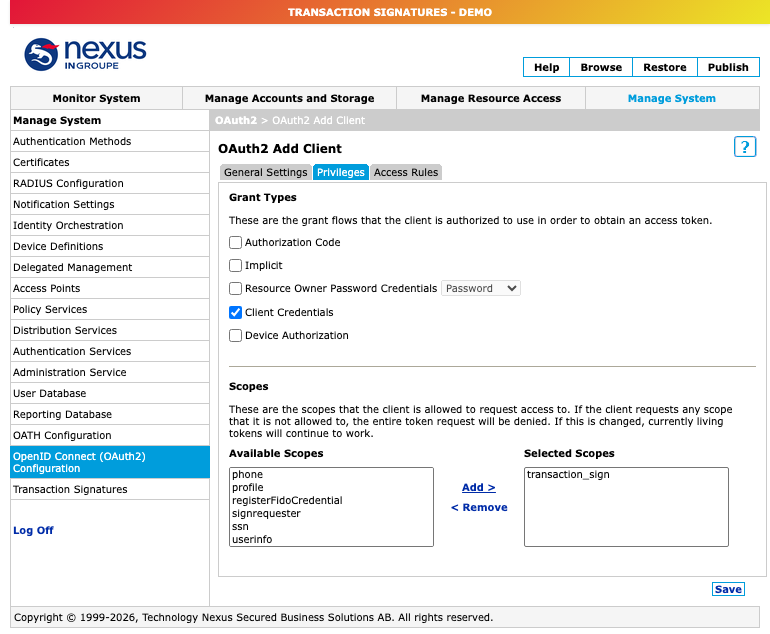
On the Privileges tab, enable the Client Credentials grant and move transaction_sign into Selected Scopes. Without the scope the API returns HTTP 403. (Do not also enable authorization_code unless you configure its consent/access rules. A client_credentials-only client is all the signing API needs.)
On the Access Rules tab, select a resource-owner access rule that authenticates the signer with a signing-capable eID (e.g. BankID (Test)) so the signing procedure can run, then Save.
Give the integrator three values
Once the feature is operational, the application developer needs:
-
client_id -
client_secret -
The DA base URL, scheme + host only, for example
https://da.example.com(no/wapath).
Troubleshooting
Status indicators stay red
|
Indicator |
Cause |
Action |
|---|---|---|
|
Database configured = No |
SQL Server host unreachable, wrong database name, or bad credentials. |
Check the DA system log for connection errors. |
|
Database connected = No |
DA reached the server, but the Hibernate SessionFactory failed (driver/network/TLS). |
Adjust JDBC TLS parameters if required, for example |
|
Tamper-resistant ledger = No (NON_LEDGER_TABLE) |
The |
In SSMS, run |
|
Tamper-resistant ledger = No (UNKNOWN) |
DA could not query |
Upgrade SQL Server to 2022 or later. |
|
SAML configured = No |
No federation is selected, or the selected federation was deleted. |
Select or create a federation, then save. |
Runtime errors
|
Symptom |
Cause |
Action |
|---|---|---|
|
Signing endpoint returns HTTP 503 |
Not licensed; feature not enabled; database not configured/reachable; or the |
Check the license, feature toggle, database connection, and ledger status. The log may include: "…signatures table is not a tamper-resistant LEDGER". |
|
HTTP 429 Too Many Requests |
A rate limit was hit: 20/min per client on the API, or 10/min per IP on the sign URL. |
Wait a minute and retry. |
|
User binding fails (strict mode) |
The eID identity differs from the |
Ensure |
|
"Signature required for Service Provider but no signature in AuthnRequest" |
The federation expects signed requests, but the request was not signed. |
This should not happen with auto-created federations. For a manual federation, ensure the signing certificate is correctly associated. |
|
Signing response validation fails |
The SP entity ID hostname may not match the SAML destination the eID expects, or the IdP certificate may not be correctly imported. |
Check the hostname and certificate. See the DA system log for details. |
|
Signature details show "-" for eID Provider / Algorithm / Signed at |
These values come from the eID response. |
If they are missing, restart the policy-service after the latest update. |
Where signatures live
Every completed signature is an append‑only row in the signatures SQL Server LEDGER table, which provides database‑level cryptographic tamper‑evidence. Integrators can additionally call GET /v3.0/sign/verify/{uniqueId} to confirm a stored signature is intact (and, if a platform key is configured, that the RSA‑SHA256 platform signature is valid).